Wednesday, August 19, 2015

18 August 2015 - Better late than never!

So I did a bit of a kak job of maintaining this blog, but at least we finished the project! And here she is:


Not too bloody shabby! I'm still getting used to riding her, but with every ride my confidence grows a little bit. So for now the plan is to just enjoy the hell out of her which isn't going to be hard on Cape Town's roads:


Thanks a lot for following my blog, and apologies for falling off the rails towards the end! If I'm feeling motivated I'll go back and fill in some of the blanks.

Cheers.

Thursday, April 9, 2015

09 April 2015 - A Teaser (Cape Town Cafe Racer)

The shaping of the infamous tank is finally done, and it's primed and ready for spraying this weekend. After all that I must say it was worth it - it looks so much better having rounded out the underside.

I'm not going to post any more photos until she's done so here's a sneak preview of what's to come!


The popping should subside once we've balanced the carbs... 
Gives her a bit of personality though!

Some pictures of our almost complete Cape Town Cafe Racer:

  
Deciding on a tank pattern. Most NB that bottom line matches seat line

 
A view from the front. Replacing fork oil. 

Please drop as a line or a link to your own project if you feel at all motivated to do so. We'd love to hear your comments/suggestions. 

Tuesday, March 31, 2015

31 March 2015 - It's alive! (Cape Town Cafe Racer)


She starts!

Oscar's done a lot to the engine since I took this video - balancing things, adjusting valves, and other stuff I don't understand and wasn't involved in. He's been reading a lot of Snowbum's unbelievably detailed articles to brush up on some rusty areas. 

There's not that much left to do on her now. We're still busy shaping the tank, after which we need to spray. We bought a second hand compressor from Cash Converters for that. 

The alternator hasn't been charging the battery and Oscar's figured out that it's due to a faulty voltage regulator so we've ordered that from BMW and are awaiting delivery. 

Footpegs from speedmotoco.com have finally arrived!

Timeless
Fixing a leak in the drive shaft
Body filling this tank is the bane of my life

Bonus Selfie:
I got my transformer helmet and present you with a selfie model shoot below:

Not a typical Cafe Racer style helmet. Much more awesome. 

Wednesday, March 18, 2015

18 March 2015 - The Engine is in! (Cape Town Cafe Racer)

It's been almost a month since my last update!

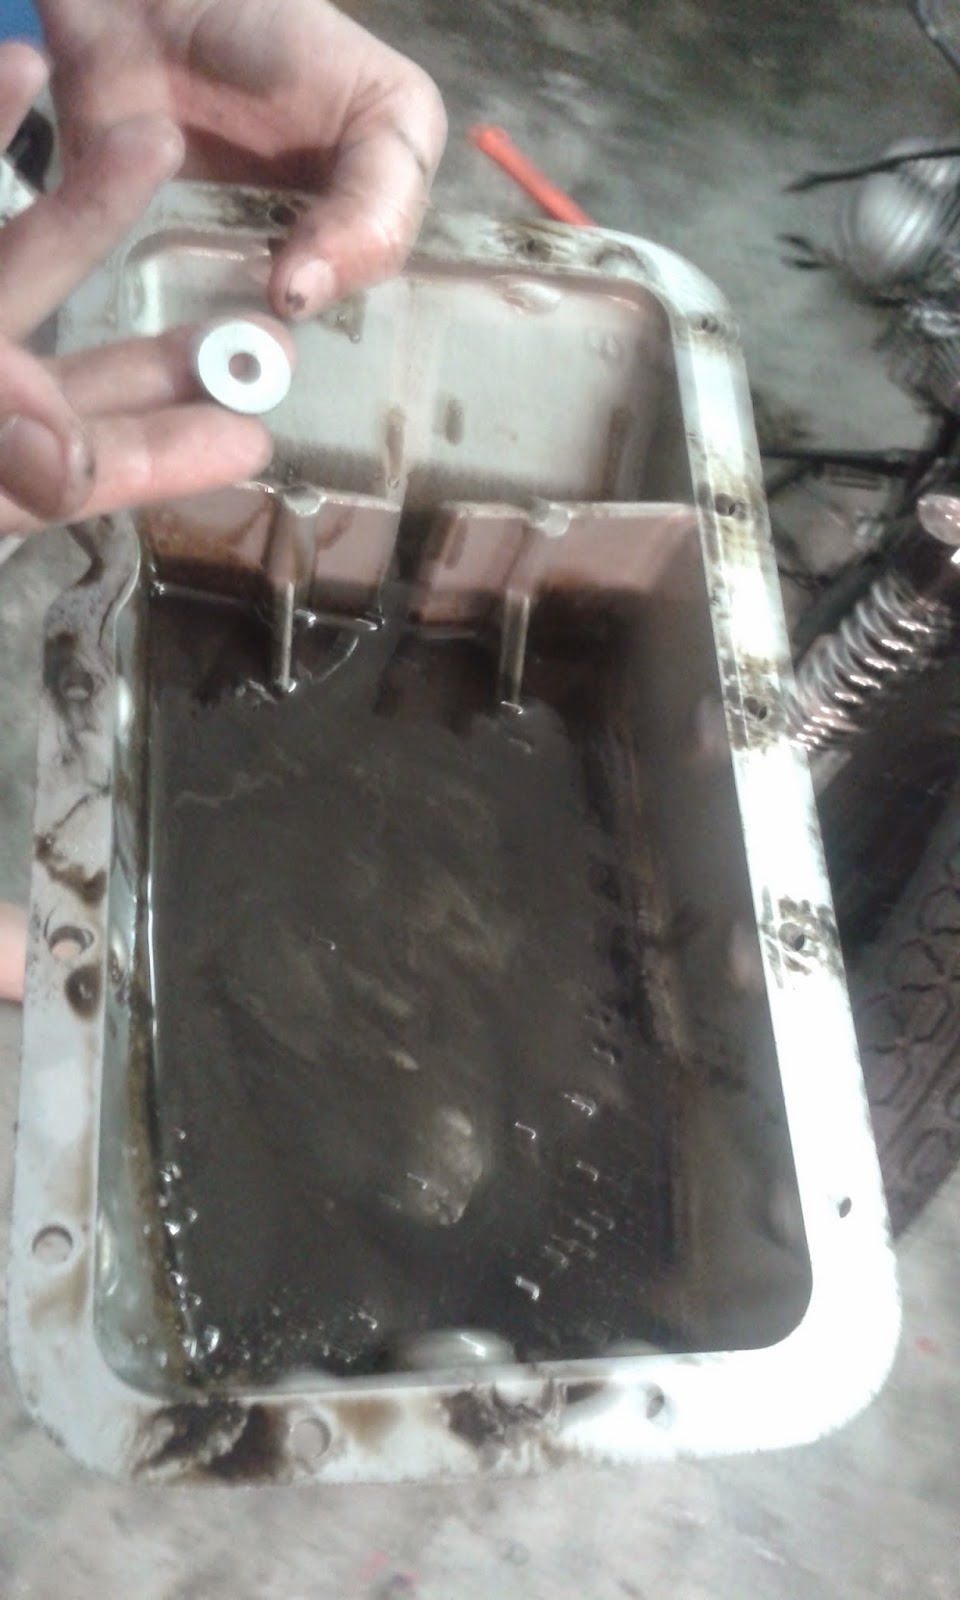
The big news is that the engine is finally back in the bike where it belongs! In fact maybe even more exciting news is that the missing washer has been found! It was in the sump as we suspected - after we wrongly suspected (read "hoped") it was in the timing chain/sprocket chamber.

We've done quite a bit of work on the engine since we got it back from vapour blasting - we removed and cleaned the heads, replaced all the gaskets and o-rings, replaced the oil filter, replaced the head covers with peanut covers. Oil pressure sensor has been replaced. Sump removed and cleaned.

The missing washer and the engine being worked on

We also got our Ultrabatt last week! I can't believe how small it is compared to the original battery. Oscar's busy making a sexy bracket for it. 

Old vs. New

We've done a hell of a lot over the last few weeks, but I'm too tired to think/write about it so I'm just going to post some pics. If I'm feeling a bit more energetic later I'll add some more. 


Engine Before
Engine After (top cover missing)


Here's a photo of us with our helmets. I sent my gigantic one back - I'm going to get a Transformer helmet instead:


Human bobblehead

Please drop us a line if you have an questions, comments or suggestions for our Cape Town cafe racer conversion.

Cheers

Sean. 

Monday, February 23, 2015

22 February 2015 - The Return of the Engine (Cape Town Cafe Racer)

My best mate, Shea, fell off a balcony last Sunday and spent the week in ICU. It was touch and go for a while and scary as hell, so it's been a pretty shit week. He's been discharged now, though, and is under house arrest at his folks which is awesome. The bike has been a great distraction.

Oscar wasn't overreacting about the engine, it looks pretty epic:

Engine after vapour blasting. Note the newly serviced inside-out carbs.
The engine cover also arrived this week - it will be sprayed to match the engine. As you can see the old air filter box has been removed and replaced with cone filters. We opened up and cleaned the transmission which was a bit dirty and rusted. The little air filter coming out of the side of the cover is connected to a breather hole that went into the old air filter. Next step engine-wise is to take off and service the heads. We've also got some peanut covers to put on there. Oh yes - and the search for the missing washer continues! Unfortunately it wasn't sitting in the timing chain/sprocket chamber which means it's probably fallen into the sump which means we'll have to remove that as well.

Freddie popped by and helped Oz dismantle the transmission
Clutch looking a helluva lot better after cleaning


I spent 3 hours unsuccessfully trying to hand drill a hole into the disk-brake to counter sink the new Acewell speedo magnet into. That was a bit of a kak jol. In the end we took it to some engineers to get it done properly. 

I did have quite a lot of fun making the bracket for the speedo sensor though. We've got a bit of a holey theme going which I carried through to the bracket. It was frustrating spending so much time making something so small, but in the end it was worth it. 


It's attention to detail that's going to set this bike apart from the rest!
Speaking of which, the paint on that disk is going to need some touching up

The wiring is all done! Besides crimping a couple of wires I had nothing to do with this! The wiring diagram looks like something John Nash came up with and the harness looked like something out of Alien Vs Predator to me. I was disappointed to not have been more involved in the wiring but at least it was something to keep Oscar busy while I was away. Without it he might have been tempted to finish the bike without me!

The cockpit is looking very sleek/minimalist with most of the wiring having been jammed into the headlight and the switches replaced with micro switches which are almost done. 

We made some more holey plates to replace the reflectors on the front fork which were a bit of an eyesore. New Ultrabatt lithium batteries have been ordered. 

Oscar wants to take the bike to Killarney race track as soon as she's done to see who can record the fastest lap. I said that sounds like a terrible idea.


Sneaky look at the bike so far


Please drop us a line if you have any questions, comments, advice, or just to say howzit!

Cape Town Cafe Racer Conversion. 

Wednesday, February 18, 2015

11 February 2015 - Planet Zastron Round 2 (Cape Town Cafe Racer)

The fact that my last two updates have both been done from Zastron is probably not a coincidence. With work being so hectic I feel as though I've barely got time to work on the bike, never mind update this blog. It's hard to do much bike work from a distance of 1000 km, though, so I guess this is the next best.

Two weeks have passed since the last update and although it feels like we hit a serious go slow recently a lot has actually happened when I think about it. It's just been mostly stuff that doesn't translate into any serious visual progress to the untrained eye (my eye).

Last week while Oscar was busy chopping and welding the subframe and marvelling over his new auto-darkening welding mask I was tasked with plugging up the engine so that we could take it to Bernard to be vapour blasted. In the process I managed to drop a washer into the engine. Needless to say this was a huge fucking bummer. It means that we're now going to have to dismantle the engine a little bit more than we were hoping to but at least we'll get to take a look at the timing chain and sprocket while we're at it.

Prepping the engine for vapour blasting involved a lot of ad-libbing

Oscar has finished chopping and reinforcing the sub-frame and the seat is now mounted.

Oscar working on the sub-frame


Oscar's also busy working on some really sexy micro switches for indicators, horn, engine start/stop etc. 

The start of the micro switch

We've also started tweaking some of the minor details as we go. For example we weren't happy with the bar-end mirrors we bought, so we replaced them with classic chrome mirrors, which we then replaced with beautiful black bar-end mirrors Oscar found. Sounds a bit pedantic, but every detail counts!

The tank has been stripped and we've pretty much decided on colours (98% sure). We don't like the lines of the original tank so we're filling it and like I said in previous post we're also going to adjust the angle of the tank ever so slightly which makes a big difference to the overall aesthetic.


Filling the belly of the tank to improve the lines


I saw a couple of pretty cool BMW conversions at a shop called Platinum Motorcycles the other day. I must have walked passed the shop 100 times during my lunch break, but I never went in. Here are some pics of their bikes:

Just got a message from Oscar that the engine is ready to be collected. Message reads "Fucking, fucking, fucking hell.". Can't wait to see it!


Time to give the workshop a once-over


Please drop us a line if you have any questions, comments, advice, or just to say howzit!

Cape Town Cafe Racer Conversion.


Wednesday, January 28, 2015

28 January 2015 - Update from planet Zastron (Cape Town Cafe Racer)

We got the races out of the steering neck! Well, Oscar did. The welding trick didn't work quite as smoothly as we'd heard, but it loosened them up enough for us to knock them out.

We had a lekker full day to work on the bike on Saturday. We continued with the reassembly of the front end...

  • Triple tree on
  • Forks on
  • Booties added
  • Clip-ons attached
  • Wing mirrors attached
  • Mudguard modified and attached
  • Wheel and caliper on
  • Headlamp on
This is what it looked like:

Dad popped in for a drink.
At 6'4" he's a bit tall for this bike
It's fokken exciting to see it taking shape!

On Sunday we degreased the engine in preparation for the vapour blasting. Besides the frame it's all we're blasting, everything else (outer tube forks, caliper, brake drum) is being hand sanded and polished! Ain't nobody got time for anodising.

We also started stripping the tank. Turns out if you don't have the right (industrial) paint stripper this can be quite a bitch. Try not to get paint stripper on your skin, it's not lekker.

Got the two seat/tail moulds back on Monday (we liked the look of two so we wanted to see what they both looked like with the tank) and there was a clear winner. This tail, which is based on an old Aprilia tail (will get more facts on this later), was a much better fit with our tank than the conventional cafe racer round/bubble tail.


Getting the lines right is going to require a bit more work to the frame than we hoped, but it'll be well worth it in the end. Obviously the sub-frame will need to be chopped, but we'll also probably need to adjust the angle of the seat mount, and lift the back of the tank slightly. Oh, and we're probably going to be altering the shape of the tank slightly to get rid of that sharp angle (v) on the side.

I visited a great shop called Retro Prestige Motorcycles in Paarden Eiland during lunch on Monday. It's a workshop/parts shop/coffee shop owned by a friendly chap called David whose R100 Cafe Racer is proudly displayed at the entrance to the shop (rightly so). We've bought quite a few cool parts from these guys. I also saw this bike parked in my street that evening! First R65 conversion I've seen in real life. It's pretty, but it's not going to have anything on our beauty!


I'm in beautiful Zastron (Free State), visiting a client at the moment, and am having serious withdrawal symptoms. I can only hope Oscar's fighting the urge to run ahead without me...

Here's a pic of the vintage tyres we bought. This bike is going to be epic.

Wheels painted black and new vintage tyres mounted

Please drop us a line if you have any questions, comments, advice, or just to say howzit!

Cape Town Cafe Racer Conversion. 

Friday, January 23, 2015

23 January 2015 - Two weeks' worth of blog (Cape Town Cafe Racer)

I've let too much time pass between updates and now I don't know where the hell to begin...

Let's start with a list - you can't go wrong with a list.

Things that are complete:

  • Main frame, wheel rims and various other parts have been bead blasted and painted black - it looks rad;
  • The carburetors have been serviced and made pretty. Oscar came up with a cool idea to switch the carburetors so that the choke and throttle levers are facing outwards. We're not sure if this is going to work yet, but it looks cool as hell;
  • Oscar has replaced the standard choke with a miniature lever attached directly to keep the ugly choke switch off the handlebars. This was a helluva mission. 
  • Replaced air filter box with cone filters. 
  • The handlebar clamps on the yoke have been grinded off as we'll be using clip-ons, and both the upper and lower triple tree plates have been polished to perfection. Oscar created an anti-vibration mount for the Acewell digital speedo.  

We decided to keep a lot of the parts as untreated aluminium, which means the last two weeks have consisted mainly of sanding and polishing parts to smooth the rough surface created by the sand casting. It's painstaking stuff... starting with 150 grit, working through, 320, 600 to 1000 and then finally using a polishing wheel. 

We've had lots of trouble with bearings this week... We're still struggling to get the bearing race out of the steering head. We've tried a number of not very graceful methods with no luck. Apparently the best way to do this is to weld around the inside of the race, and when it cools down and contracts it pops out on its own... So Oscar's gone to hire a welding machine today to try this out. 

On the other hand something cool that we achieved with a bearing this week was the fitting of the new bearing on the steering stem. We put the bottom plate in the freezer for an hour or two, then stuck the bearing in the oven for half an hour and the thing just slid right on (you could barely even fit it over the top before).

We've had two different seats moulded which we'll hopefully be trying out this weekend. Once we've chosen a seat we can chop the subframe to fit. Lot's of other bits and bobs being grinded, sanded, polished, machined, cleaned, stripped etc. in the background.

We've just started with the rebuild, but very superficially - we just attached the two stands to the frame :) After all the frustration with the bearings we needed a small win!

I've been a bit of a kak partner due to having a ridiculous workload recently. While I failed in my one job to sand and polish the lower brace (triple tree), Oscar's used his ADD powers to just about sand and polish every part to sparkly perfection.

As a side note, Oscar's got cuts and bruises all over and I think he's developing an oil stain tan. He called me a pussy after I insisted on wearing (motorcross) goggles the first time I grinded something because he'd removed the safety guard... in my defense they only stayed on for 5 minutes.

We still haven't touched the engine yet...

Selfie with Oscar polishing
Trying to get race out of steering neck


Please drop us a line if you have any questions, comments, advice, or just to say howzit!

Cape Town Cafe Racer Conversion. 

Friday, January 9, 2015

8 January 2015 - The Strip Begins... and ends! (Cape Town Cafe Racer)

The holidays are over! After a couple of beautiful summery rides through Cape Town we finally started the strip on Tuesday this week, and finished it last night (save for the swing arm which we didn't have the right tool for - apparently a 27mm thin-wall socket). The ride was great, besides the brakes which were pretty terrible. Hopefully they'll be cool after a service, otherwise we'll consider adding a second disk.

(Almost there)

(Voila!)

We were quite surprised at how smooth the strip went. We managed to get pretty much the whole thing done in just two evening sessions.

Next we'll be taking an angle grinder to the frame/sub-frame to shorten the the seat and remove all of the fittings we don't want/need before sending it off for bead blasting.

As far as the engine goes we've just removed and are servicing the carbs for now, and are considering our options with respect to the bead blasting. We'll probably take it in to be serviced rather than do it ourselves - it's just a matter of whether we're going to do this before or after the bead blasting.

(One down, one to go)

There's a lot of stuff going on in the background - Oscar's been missioning around meeting suppliers and fellow enthusiasts, he's bought quite a few minor parts (clutch and break levers, indicators, etc) and ordered some of the more unique/specific parts, the exhaust is in for modification - things are happening! While I sit on my ass at work daydreaming.

I'm off to a wedding for the weekend, so no more physical work for now. There will be lots more constructive daydreaming going on in the meantime though!

Here are two cool links we came across this week:

http://thebikeshed.cc/2013/12/13/eriks-alaskan-r90/
Erik's R90 cafe conversion is definitely one of the most beautiful cafe racers we've come across so far and it's given us lots to think about.

http://www.bikeexif.com/build-cafe-racer
This article by car designer Charlie Trelogan is all about his interpretation of a classic cafe racer design and he explains it really well with great diagrams (and a beautiful example bike).

Cheers.

Please drop us a line if you have any questions, comments, advice, or just to say howzit!
Cape Town Cafe Racer Conversion.